Pokazywanie postów oznaczonych etykietą Steampunk. Pokaż wszystkie posty

czwartek, 24 marca 2016

Easter dragon eggs /Świąteczne smocze jajka


                                       ,,Oh well what's life without a few dragons ''
                                                                   Ron Weasley
            
Witam was serdecznie dzisiaj chciałabym wam pokazać mój nowy projekt stworzony dla Retro Kraft Shop. Święta Wielkanocne zbliżają się coraz większym krokami, dlatego też chciałabym pokazać jak przygotować świąteczne pisanki z zabawnymi dodatkami ;) Stworzyłam steampunkowe smocze jajeczka dla moich cudownych siostrzeńców.

Hi my crafty friends today I would  like to show you my new project for Retro Kraft Shop . For few days will be Easter ,so I thought that I will show you how to make Easter eggs with funny twist. I create steampunk dragon eggs for my lovley nephews;)


 No to zaczynamy !Na początek na styropianowe jajko nałożyłam farbę akrylową DecoArt (kolor Titan Buff).Następnie zaczęłam suszyć nagrzewnicą .Nagrzewnicę trzeba trzymać bardzo blisko po pewnym czasie zaczną się tworzyć ,,łuski smoka'' .

Here we go! First I painted styrofoam egg with DecoArt fluid acrylics Titan Buff. Then I used heater and start to heats but very close . Styrofoam egg start to pop up and looks like scales.


Następnie nałożyłam preparat dający efekt spękań Weathered Wood.Wielkość spękań jest zależna od grubości nałożonej warstwy wierzchniej . Im grubsza warstwa wierzchnia tym większe spękania .
W ostatnim etapie nałożyłam preparat postarzający Carbon Black . Schnie bardzo szybko więc nie trzeba używać nagrzewnicy . Kiedy wszystko już wyschnie zobaczycie cudne spękania.

Then I put on  my egg ,crackle medium Weathered Wood. When using Weathered Wood ,the thickness of the top coat will directly affect the size of the crackled finish. The heavier the top coat the larger the cracks.
When it dry ,  I applied antique cream carbon black from DecoArt. It's dry very quickly ,so you don't need to use heater. When it dry you will see beautiful cracks .


Aby nadać trochę koloru smoczym jajkom ,użyłam mikę w proszku oraz inkę gold. Oczywiście można też użyć mgiełek lub farb. Nadszedł czas do ozdabiania ,przykleiłam metalowe trybiki oraz nałożyłam klej tworząc wzory na jajku.Kiedy klej wysechł nałożyłam czarne gesso ,a następnie inkę gold.
 To colour this egg ,I used mica powders and inka gold, but you can also used acrylic paints or mists. Now it's time to add some metal gears ,I also applied some glue. When it dry I painted it with black gesso and inka gold.


Kolejnym krokiem będzie przygotowanie smoczych skrzydeł. Można użyć gotowych tekturek ,lub po prostu wyciąć z tektury. Nałożyłam Crackle Accents wzdłuż skrzydeł . Następnie nałożyłam czarne gesso. 
Next step is to prepare awesome dragon wings. I applied crackle accents on this chipboard. When it
dry I cover it with black gesso.  


Teraz zaczyna się najlepsza zabawa. Kolorowanie skrzydeł , rozpoczęłam od nałożenia farb DecoArt -cobal turquise oraz patina green. Następnie użyłam tuszy StazOn -olive green oraz gothic Purple, te tusze bardzo szybko schną i można je używac na każdej powierzchni. Aby dodać blasku nałożyłam palcami inkę gold.                           

Now the fun begins. I started painting with  DecoArt  Cobalt turquise, patina green. Then I  used StazOn olive green and gothic Purple, they are  fast-drying permanent inks so they work on all surfaces .Then I used my fingers and began to apply inka gold here and there.


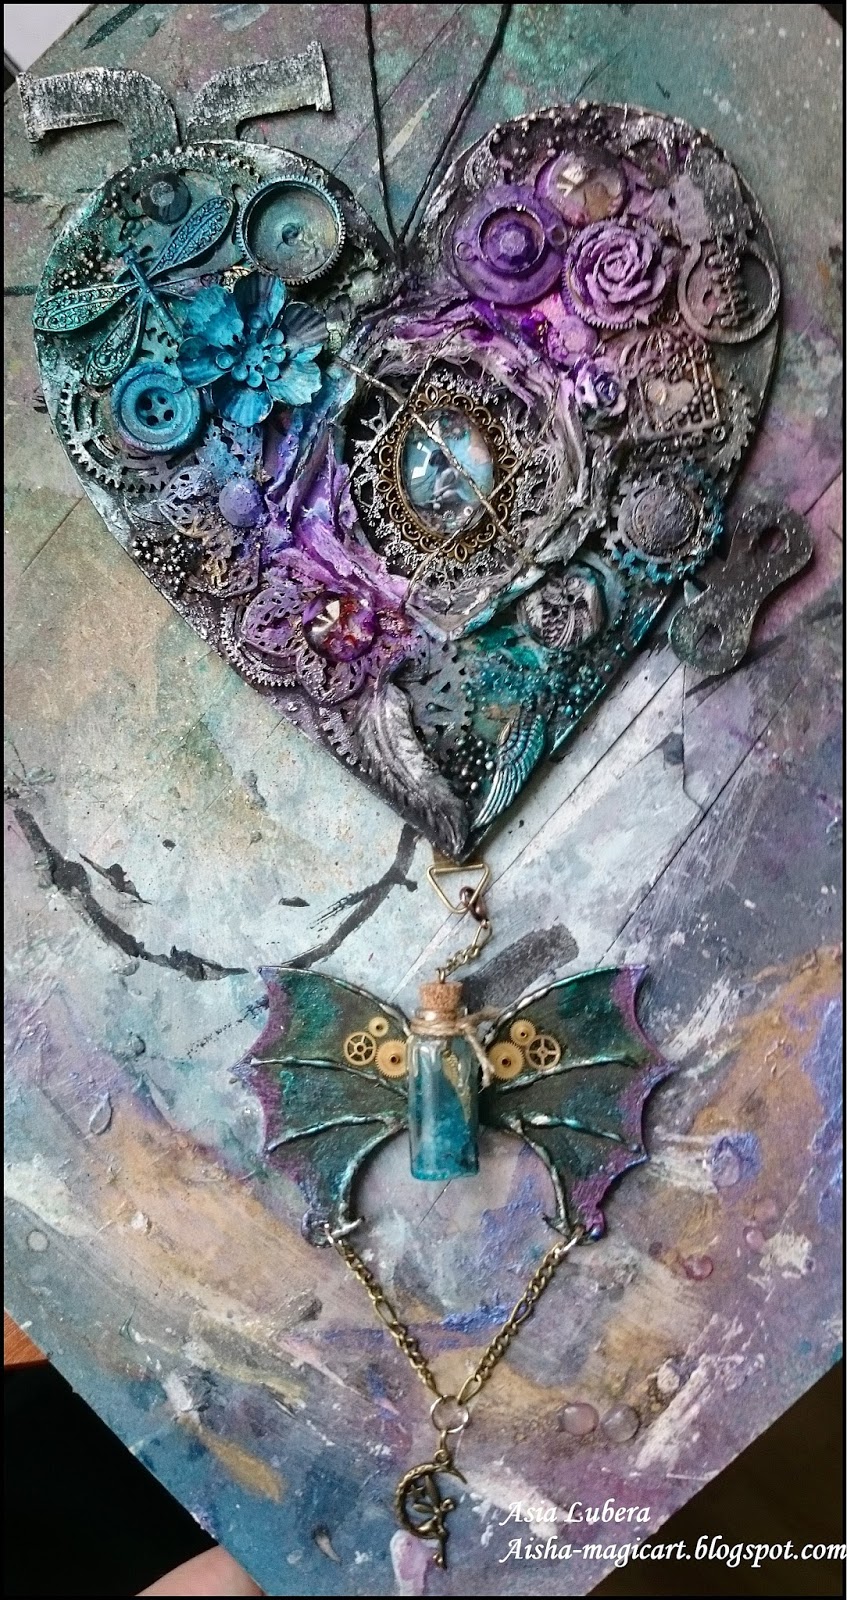
W ostatnim kroku dodałam do gotowych jajek :skrzydła , steampunkowe okulary , ćwieki , kaboszony i łańcuszki.
In the last step I added wings and some metal embellishments :steampunk glasses ,brads, cabochons and chain. 


Przy drugim jajku postępowałam w podobny sposób tylko ,że nałożyłam najpierw czarną farbę następnie preparat Weathered wood i na końcu jasną farbę Titan Buff. Dodatkowo dodałam kilka stempli .
 In second egg I used first black paint and then weatherd wood and paint Titan buff. You can also stamp some images onto this egg .


I tak powstały odlotowe steampunkowe smocze jaja. Mam nadzieję ,że podobało Wam się tak samo jak mi tworzenie tych jajek ;) Może spróbujecie stworzyć swoje własne Świąteczne steampunkowe jajka ;) Wesołych Świąt - Aisha
And so we have awesome steampunk dragon eggs.I hope you will enjoy it - as much as I did creating it and  maybe you will try some of the ideas shown in your own Eastereggs. Happy Ester XOXO Aisha

Entering them to the following challenges:

Southern Ridge Trading -Easter .

Simon Say stamp- Monday Challenge Food or drink .

 SanDee & amelie's Steampunk Challenges  .

Altered Eclectics: "March Challenge - Anything Goes"

Dream in darkness- challenge ATC .


Altered Eclectics
 Użyłam /I used:


Antiquing Cream - Carbon Black - DecoArt Media Fluid Acrylics - Cerulean Blue - DecoArt   Media Fluid Acrylics - Titan Buff - DecoArt                

Kaboszon przezroczysty okrągły 1,6cmInka Gold 62,5g - Srebrny (902)     Media Fluid Acrylics - Cobalt Turquoise - DecoArtCrackle Accents 59ml Weathered Wood 59ml - DecoArt              


Inka Gold 62,5g - Stare Srebro (909)   Inka Gold 62,5g - Zielony (928)   Inka Gold 62,5g - Hortensja (930)


  Tusz StazOn Midi - Gothic PurpleTusz StazOn Midi - Olive Green

Tusz Distress Mini - Vintage Photo  Małe aplikatory do tuszów - Mini Ink Blending Tool - Ranger  Kółka - stempel akrylowy Prima


Ćwieki metalowe 14x8mm - brąz  Ćwieki metalowe 9x5mm - brąz  Metalowy trybik 2 - brąz

Metalowy trybik 1 - brąz  W chmurach - Prima Junkyard Findings


Asia


sobota, 20 lutego 2016

Masculine layout

Hello! Hope you all have wonderful week .  I'm so excited to share that I am guest design for  
Scrapki wyzwaniowo for this month! I want  to invite you to the new challenge on the blog Scrapki wyzwaniowo. I create a masculine layout in a vintag style . I used  my favorite 7 dots collection- Cold Country . I also added awesome elements stickers from Thoughts Keeper , and paper from Illuminations.

 Witajcie! Dziś mam przyjemność ogłosić ,że dostałam zaproszenie na gościnny występ w Scrapki wyzwaniowo w tym miesiącu. Chciałabym zaprosić was na nowe wyzwanie na blogu Scrapki wyzwaniowo. Stworzyłam męski layout w stylu vintage. Użyłam moje ulubione zdjęcia z kolekcji 7 dots -Cold Country . Dodałam także napisy z kolekcji Thoughs Keeper oraz papiery Illuminations
For background I used distress ink( tea dye, vintage phot, walnut stain),distress sprays stain(gathered twigs, peeled paints ) 13 arts mist (pearl brown ,olive green). I also used papier Mechanical Illusions  and Prima Cartographer  . 

Do stworzenia tła użyłam tusze distress ink( tea dye, vintage phot, walnut stain),distress sprays stain(gathered twigs, peeled paints ) mgiełki 13 arts (pearl brown ,olive green). Oraz papiery  Mechanical Illusions  and Prima Cartographer  . 


I hope you like my vintage masculine layout ;) Mam nadzieję ,że spodoba się wam mój męski layout ;)

XOXO Aisha

With this layout ,I take part to the following challenges: 


                                                      A Vintage Journey- Industrial


czwartek, 11 lutego 2016

Dark Valentine

,,Words can  only express what is said and heard ,but not what is hidden deep inside the heart.'


Hi my friends .Today I want to show you little different valentine create for Creative Embellishments .I dont like light , bright colours , so my valentine is a little bit grungy and dark with touch of colours.I tried to work with pastels colors but always had to add black accents ;)


 I love wings especially awesome dragon wings . I painted them with black gesso. I used perlen pen and put on along the wings.When it dry I cover it with black gesso and just touch with old silver  inka gold. I also used some paints 13 arts : mettalic turquise,blue , violet  and mica powder bottle green.


I  used lots of gears to create background . I also added :flowers, buttons, clock parts, glass beads and many more. I used gel medium to glue it all together To give my project more steampunk look I added pipe, key to wind up and lightbulb   .Finally to finished my heart I used some colours :dylusions ink( crushed grape , calypso teal and slate grey )and 13 arts pearl black  . Mica powders  frozen lake, bottle green and touch of  ink gold old silver .


So this is my dark grungy valentine heart ;:)
 Thank  you so much for your attetion and wish you  a beautiful, filled with love Valentine's Day;)
 I'm sharing my dark valentine here:

Things to alter- any thing goes not cute

Country View Challenge -Make your own background

Anything but cute mix media challenge- grungy love


Simon Says Stamp- spritz and spray. I used Dylusions Ink sprays  and mists 13 arts .

Southern Ridge -Anything love . I create Valentine in dark colours .

XOXO Aisha